Baked Asparagus and Guanciale

Baked Green Asparagus with Guanciale

It’s that time of the year again! Asparagus is now in its best moment, and it will last till the end of May.

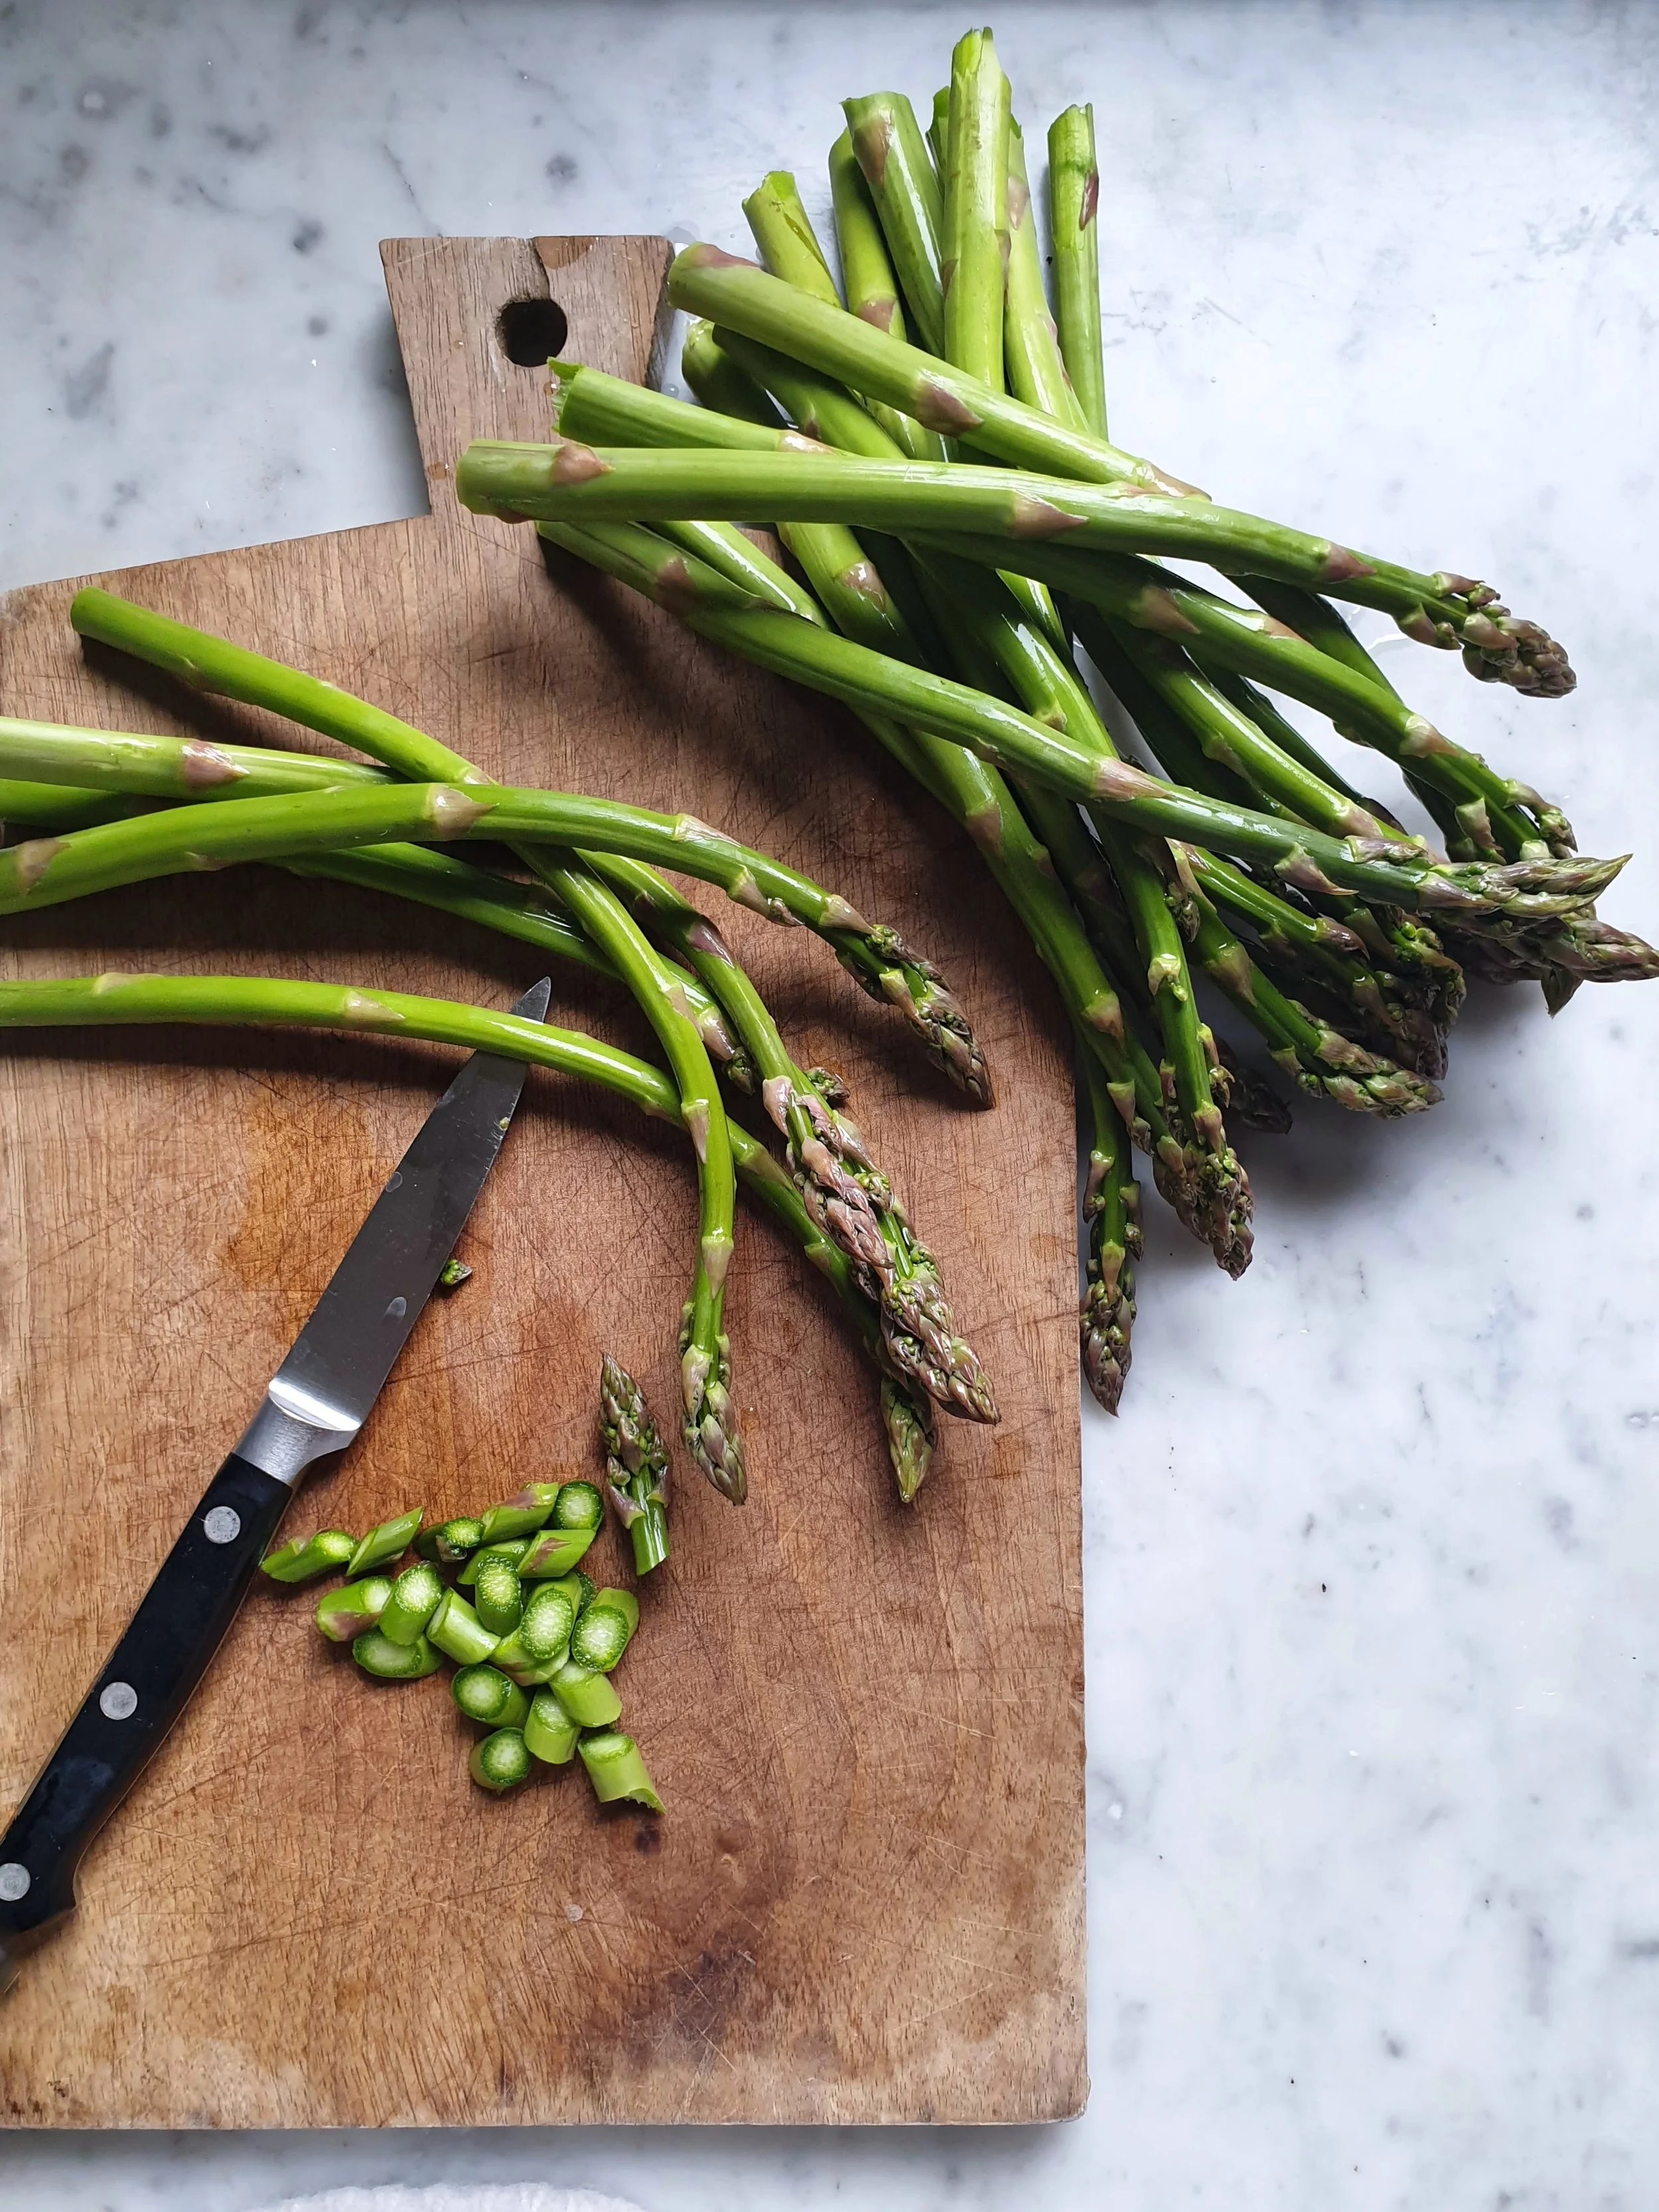
Most of the time I like them simply boiled but these tiny, finger size green asparagus are great for baking.

May is when all the fresh, new springtime vegetables come to their best.

Asparagus, along with peas, are the stars of the month. We won’t see them on the farmer’s market stalls for a long time, being their season relatively short. I’m talking about local food, obviously. Now that we can have everything any time, it can be hard to understand what’s really seasonal. So, going to farmers’ markets is an excellent way to learn.

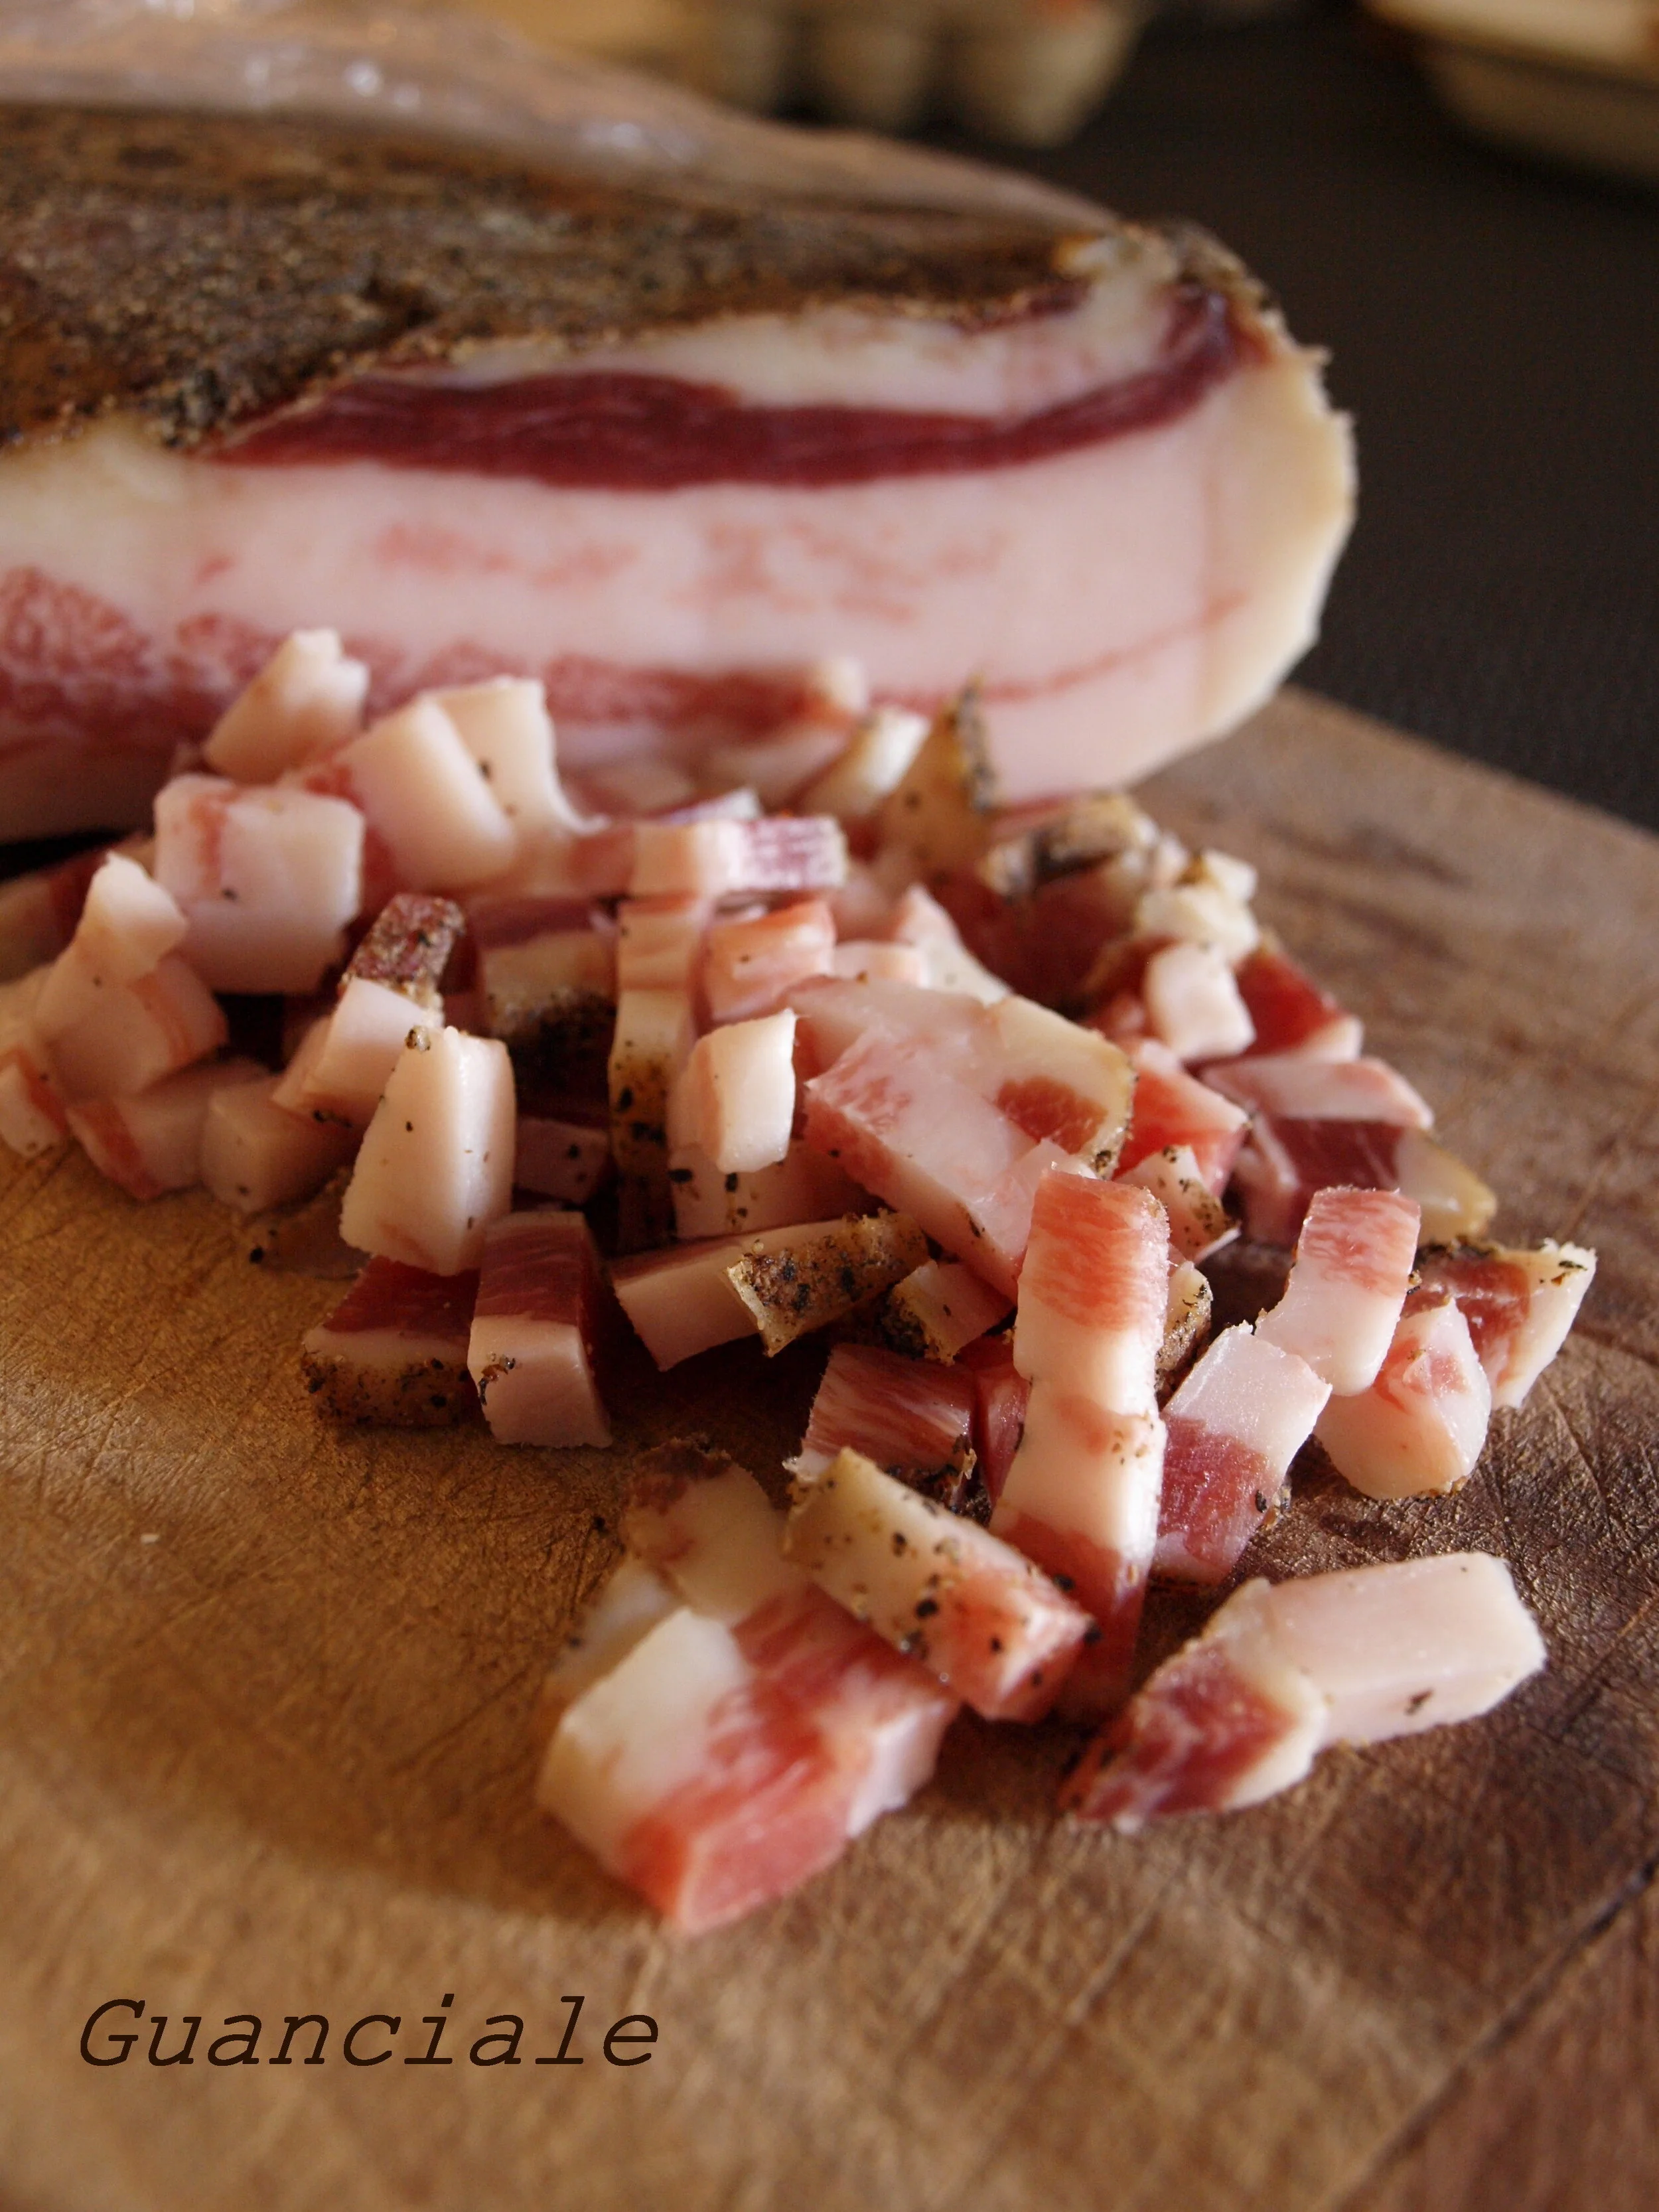
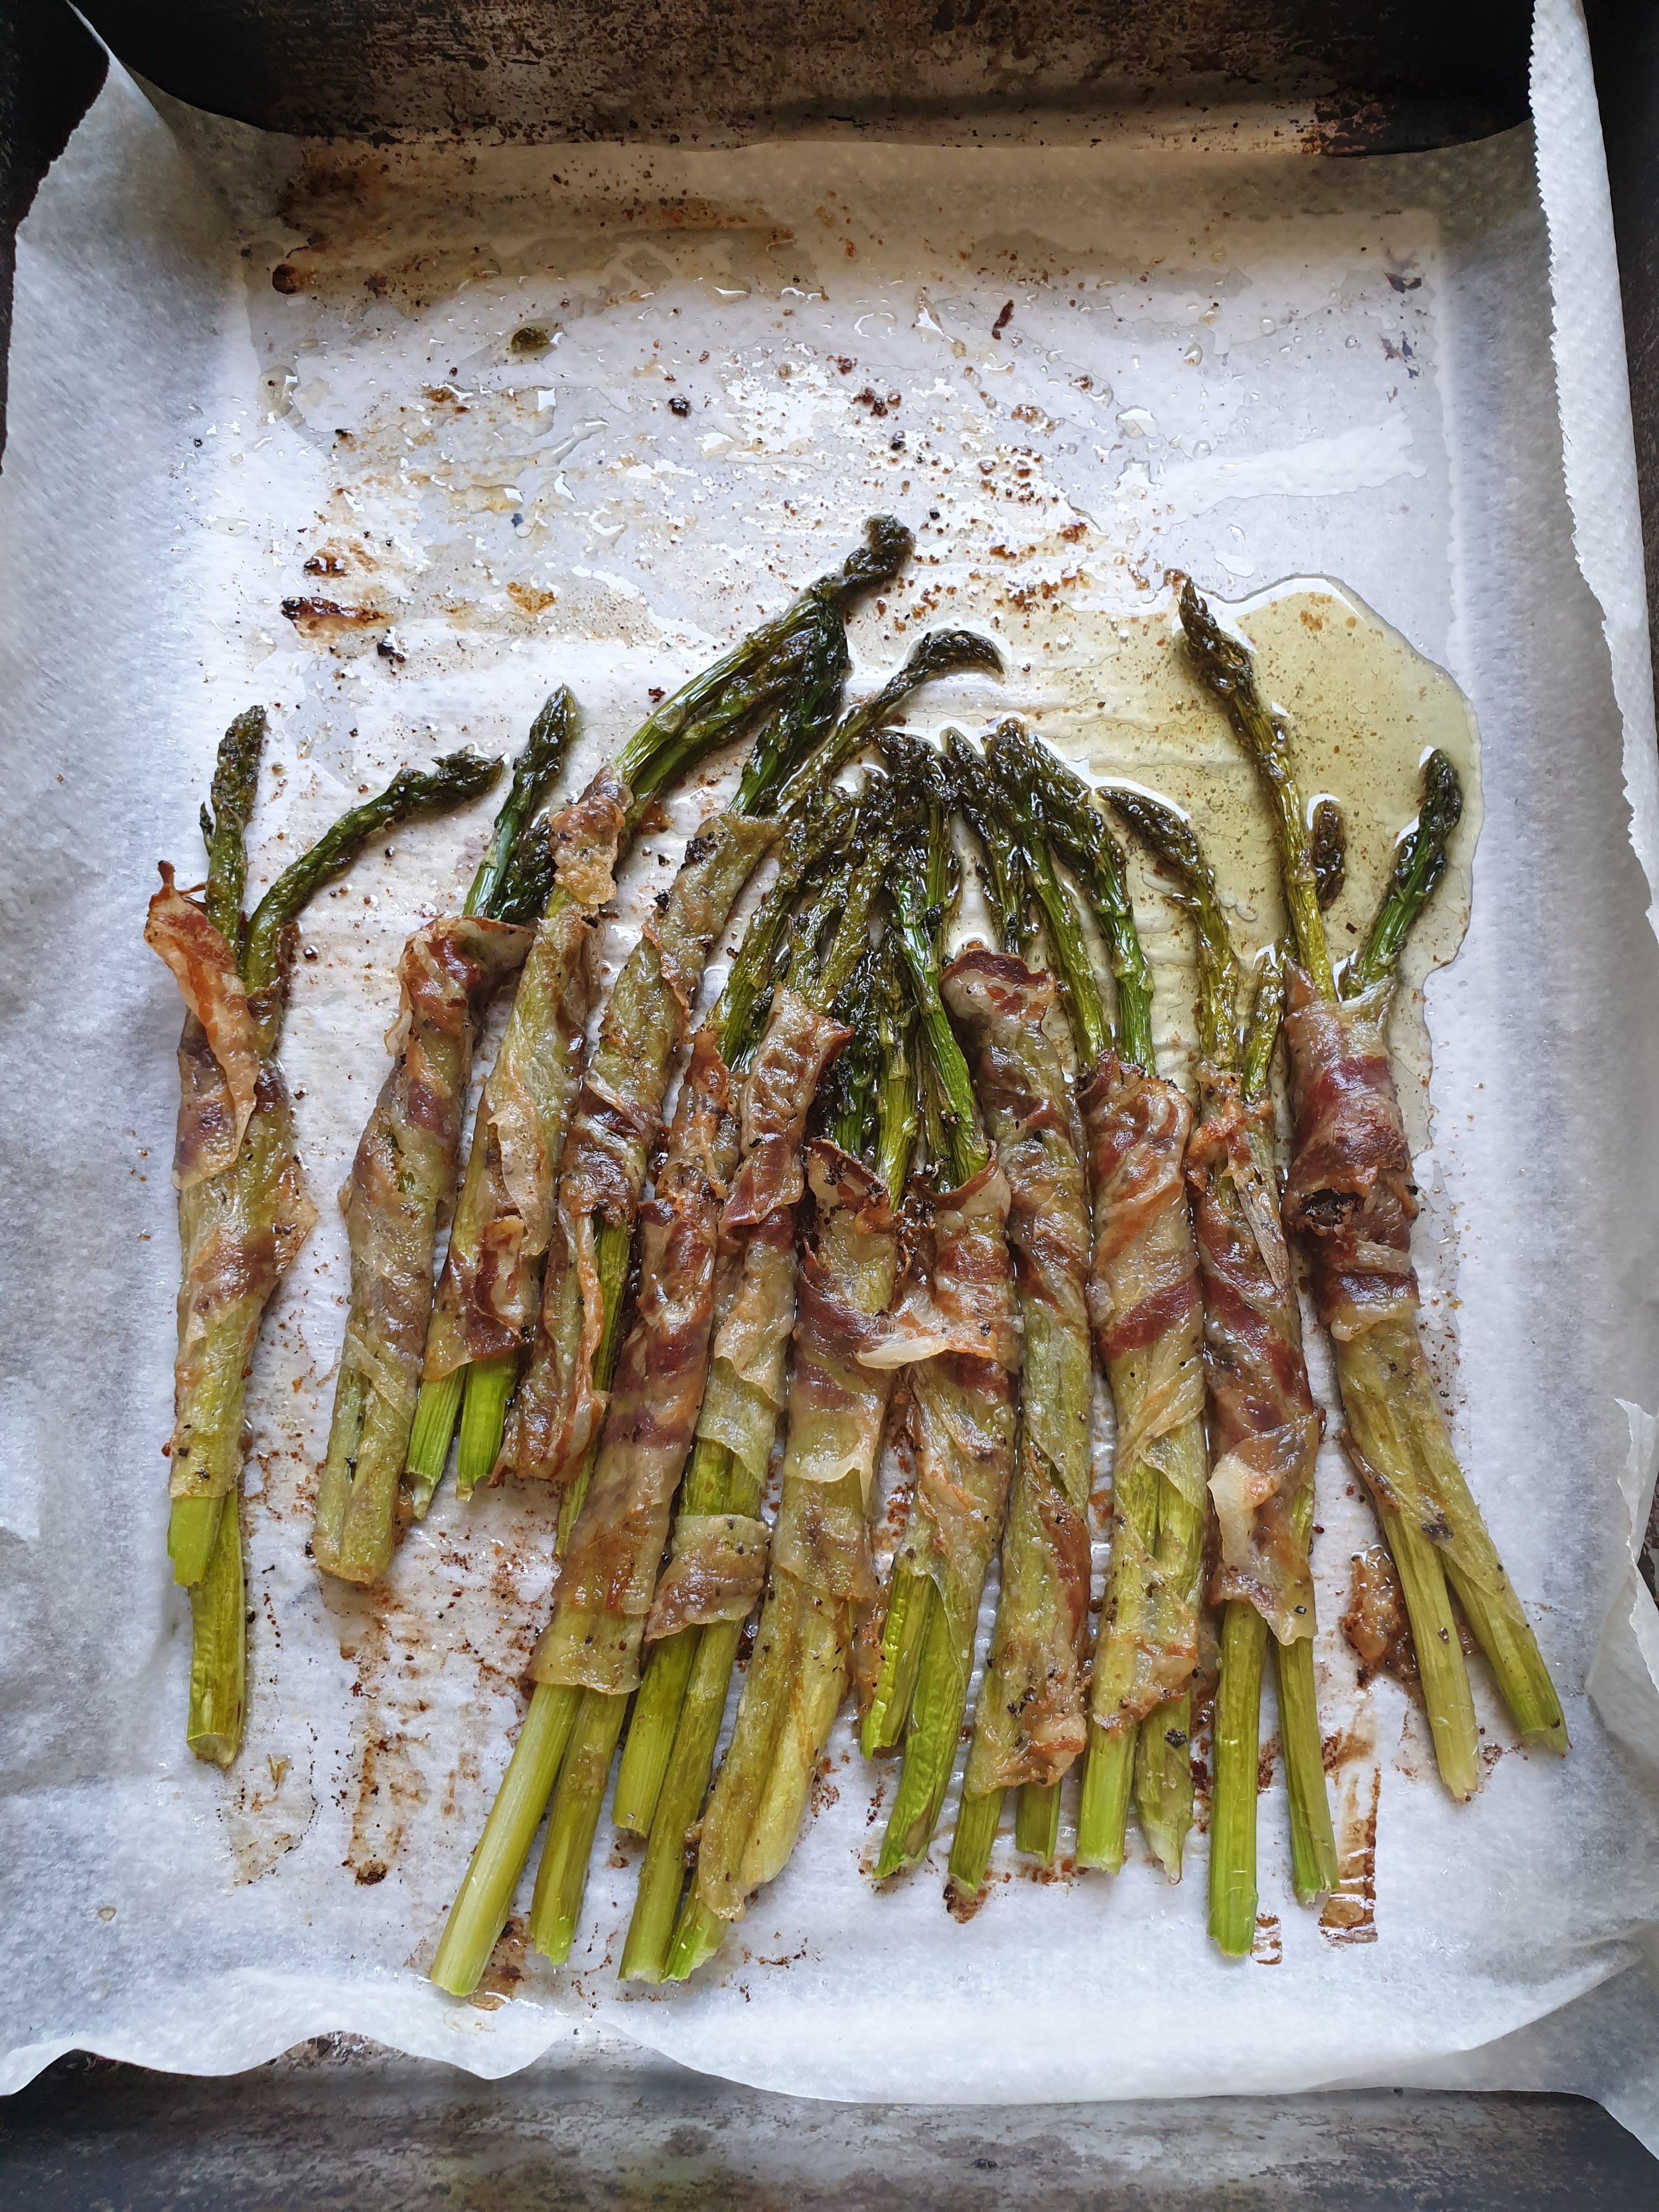
This recipe was perfect for that flimsy, finger-like Green Asparagus. The thin slices of Guanciale gently keep them moist, while its delicate boldness embraces the sweetness of Asparagus.

Ingredients for 4 servings served as a starter or side dish. Double the dose if making the main course

500 gr of thin Green Asparagus

150 grams of thinly sliced Guanciale, if you don’t find it use Smoked Bacon.

One tablespoon of extra-virgin olive oil

Freshly ground black pepper

Directions

Preheat the oven 200° / 400F, set the rack near the top of the oven

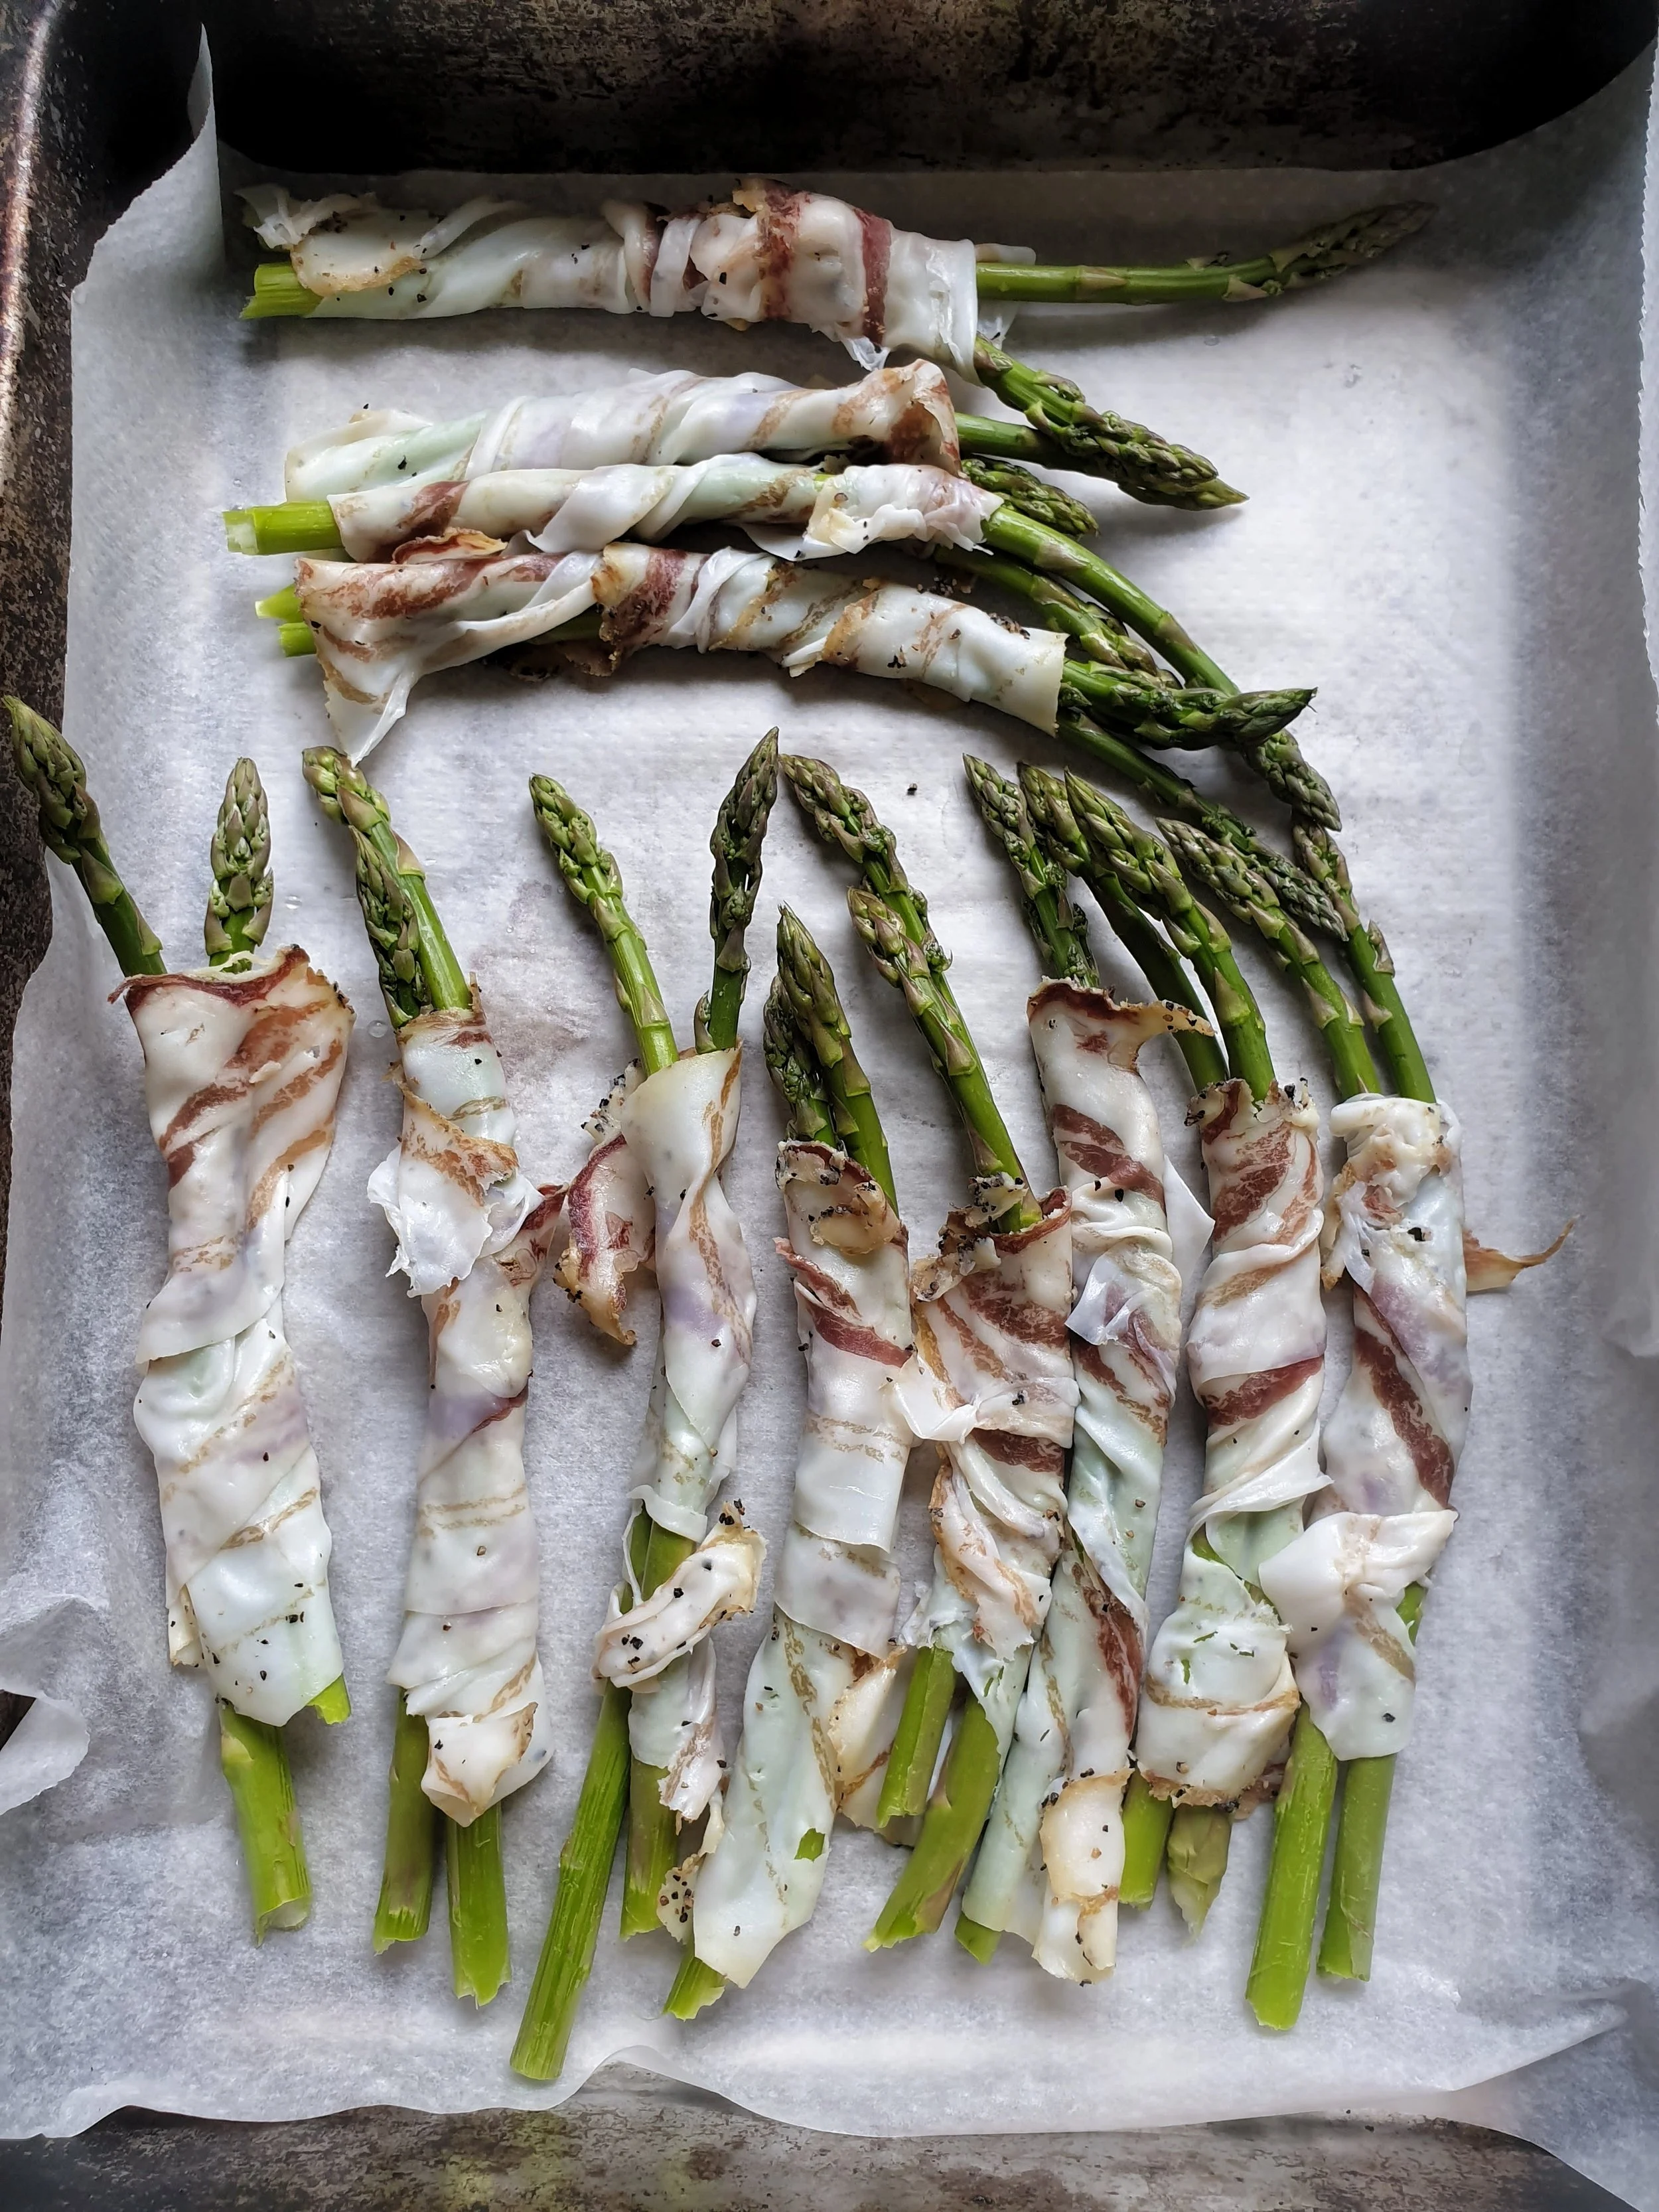
Wash the Asparagus and dry them with a towel. Snap the tails; there’s always a point where they will break easily. Don’t throw the ends; you can use them for soup or pasta/ rice recipes.

Line a baking tray with parchment paper.

Wrap 2 Asparagus with the Guanciale or Bacon, lay on the baking tray. Continue till you finish. Drizzle with olive oil and bake till the Guanciale has melted the fat. It will take between 4/6 minutes, depending on the oven and how thin the slices are.

Once ready, sprinkle with good freshly ground black pepper and serve immediately.


Springtime Foraging

Foraging is a tradition in the Venetian countryside, and as such, it’s deeply rooted in my culture. I can get lost for hours wandering around my secret places and gathering all kind of different vegetables that Mother Nature so kindly offers to us in generous amounts. The best season is springtime; after the dark and cold winter days everything comes back to life with an explosion of colours and flavours. I remember when I went with my mother in the deserted fields, before farmers started ploughing the soil to pick up dandelions and poppies’ greens that she cooked together; being the poppies rather sweet they were used to balance the bitterness of the others, though as an adult today I really appreciate bitter taste. I am living in Provence now and from March till the end of May we can gather quite a variety of wild food as leeks, asparagus, silene, hops, dandelions, chicory, wild rocket, wild broccoli and many others. I come home and use them to cook different recipes from traditional ones to others I developed myself, but the challenge for me was to find something to make a dessert with. One day I tried making a very simple Panna Cotta flavoured with wild fennel, that I discovered being so delicious cooked in syrup. I chose raspberries but you can serve it also with strawberries: the acidity and freshness of fruits balances the velvety sweetness of panna cotta and matches wonderfully with the aniseed flavour of fennel. It is a light dessert to serve after an elegant dinner.

Rice with foraged greens

Wild Fennel Panna Cotta with Raspberries

Ingredients for 4 servings

400 ml of fresh liquid cream (30% of fat)

10 gr of jelly in sheets

200 gr of sugar

400 ml of water

A pinch of salt

250 gr of raspberries

Two branches of wild fennel washed and finely chopped

First of all prepare the syrup: put the water and sugar to boil, let cook slowly for about 15 minutes or till the syrup begins to thicken and makes bubbles, add the fennel and turn off the fire. Let cool, in the meantime prepare the panna cotta: pour the cream in a saucepan, add the pinch of salt and warm it gently, doesn’t need to boil but it should be warm enough to dissolve the jelly. Soak the gelatine leaves in cold water till they get soft, then drain and add to the warm cream, mix very well and add 200 ml of the syrup you’ve prepared before. Stir to combine and pour in silicone moulds, refrigerate for at least 4 hours but you can keep it 1 or two days well covered with a film. Wash quickly the raspberries, put them in a bowl, add the remaining syrup and  mix very gently. To serve: unmould the panna cotta, place in the middle of a dessert dish, garnish with the raspberries and syrup and serve.

Zucchini and Lemon Cake

Yesterday I posted this photo on Instagram and many of you have been asking for the recipe. So here it is. I adapted it from David Lebovitz, which adapted from a book of Gina de Palma "Desserts from the Babbo Kitchen ". The variations I made were cutting in half the quantity of sugar and changing the spices because I wanted something fresh and lemony. I also had to change the technique as with so much less sugar it didn't work. The result is a moist cake that melts in your mouth, literally. With the quantities, you can make two loaf pans of 20 cm/ 8 inch long or 2 round cake pans of 18 cm / 7 inch. It keeps well wrapped or under a cake dome for a few days.

20200904_153422-01.jpeg

Ingredients

I prefer to use weight instead of cups, you will get better results! If you love baking, a scale is a must, it measures also the ml and cl ( liquid stuff)

135 gr of almonds, toasted

280 gr of flour

1 teaspoon of baking powder

1/2 teaspoon of baking soda

1 teaspoon of kosher or sea salt, I use Fleur de Sel

1 teaspoon dried ground ginger

1 teaspoon of bitter almond extract, you can find in the grocery stores or online

3 large eggs

170 gr of sugar

1 cup or 250 ml of extra-virgin olive oil

300 gr of grated zucchini, I used a food processor with the grating disk, or you can use a grater with large holes

For the lemon glaze

60 ml of freshly squeezed lemon juice

65 gr of granulated sugar

140 gr of powdered sugar

Directions

Brush the inside of the pans with some of the olive oil, dust with flour and tap out the excess.

Preheat the oven at 180° /350F

Finely chop the toasted almonds in a food processor by intermittent pulse, that's important for not heating them, which would ruin the almonds. Sift together the flour, baking powder, baking soda and ginger. Set aside.

Whisk the eggs with the sugar and olive oil, it’s easier if you do in a stand mixer on medium speed, until fluffy and light, about 3 minutes. Change the whisk with the paddle, add the salt, the bitter almond extract and the sifted flour, mix in on medium speed just the time to combine, about 30 sec. Stir in the chopped almond and zucchini, scraping the sides of the bowl if necessary, don’t overwork the batter. Pour the batter into the loaf or cake pan, smooth the top and bake for 45 to 50 minutes. Personally I had to bake for 1 hour, even if I made 2 smaller ones, but maybe it’s my oven. It's ready when a toothpick inserted in the middle comes out clean and dry. Towards the end prepare the glaze. Sift the powdered sugar in a bowl, add the granulated one and the lemon juice, whisk together vigorously for a couple of minutes. I suggest not to use all the lemon juice, it happened to me that it was too liquid, so I needed to add more sugar. the glaze should be runny but not too thin.

Let the cake cool down for 10 minutes, then carefully turn it down on a cooling rack. I used a large dish under the rack so I could easily brush the cake with the glaze while it’s still warm, like in the photo below. Wait that’s completely cold before moving onto a serving dish.

As you can see, I made one round and one rectangular, the rectangular one was cooked before the round, let’s say 5 minutes.

20200903_140302-01-01.jpeg

How to make the best crêpes with Dandelion flowers jam

This recipe for crepes is the one I use both for savoury and sweet, and with which I obtain thin, light and irresistible crèpes. Among the ingredients, you will find water (it serves to make the crepe thinner) and clarified butter to cook it. In essence, its peculiarity is to have a smoke point similar to extra virgin olive oil, so it does not burn and gives a delicious flavour to the crepes. You can find how to make clarified butter online. There are lots of videos about the subject.

20200409_144629-02.jpeg

Crêpes and Dandelion flowers’jam

Ingredients for about ten crepes

Two eggs, 150 gr of all-purpose flour, you can also mix flours of your choice, 350 ml of full-fat milk, 50 ml of water, ½ teaspoon of salt, 30 gr of clarified butter

Directions.

I Break the eggs in a bowl, beat them a little with the whisk, start adding alternating the sifted flour and the milk /water, mix well until I have a slightly liquid and smooth batter. I Add the salt, mix and leave to rest for at least an hour in the fridge. It is possible to prepare the mixture the day before, and for me, it gets even better.

To cook good crepes, you need a heavy pan, because of its capability of retaining the heat. I put the pan on high heat, and I grease it with the melted clarified butter. For this, I prefer to use a silicone brush because it’s the only one that can resist the high heath. The important thing is to grease very well the pan, in this way I obtain that delicious crepes that in France are called Crepes dentelle, which means laced crepes. I also want them slightly browned, which gives a better taste.

I prepare a measuring cup and thus to have the exact dose to be poured so that I can throw it in one go. At this point, I rotate the pan to spread the paste evenly, cook until it is golden brown, then turn it and finish cooking on the other side. Once it is ready, I slide it onto a plate and so I do with the remainings, building up a pile. If I have leftover, I cover with a film and keep in the fridge.

Dandelion flowers jam

It’s springtime, and as I live in beautiful countryside, I can go foraging as much as I like. This jam’s like honey, even the taste makes me think of dandelion honey, which doesn’t exist, I guess.

I give you the quantities to make a medium pot of jam, for the flowers, as my scale was out of use, I got a bowl for soups full of flowers, 300 ml of water, 200 gr of sugar, juice of one lemon, one spoon of freshly grated ginger. Some recipes call for using only the petals.  I tried once, but I found that the taste was weaker and being a tendentially lazy person I was happy with this. So I cut the flowers at the height of the receptacle.

Directions

I wash the flowers thoroughly, and then I lay them on a clean teatowel. I put a saucepan with the water and sugar on low heat, and I mix well to dissolve the sugar. Once the sugar has dissolved, I let it cook until it starts to form bubbles evenly. Now I add the flowers, the ginger and the lemon juice and keep on cooking at the stade of jam. It is essential to stay there because when it is almost ready, it goes fast and can become too thick. The traditional way of testing a jam will work. When it’s ready, I put in a clean jar and keep in the fridge. If you make several jars, you should consider sterilizing.

I served myself ( quarantine demands) a crepe with whipped coconut cream topped with a teaspoon of dandelion jam. About the coconut cream: I prefer the one in tetra pack, it’s more fluid, and you don’t have the taste of tin. For the rest, I just whipped it as usual cream. With this, I had a wild blackberry leaves tea. To make it bring the water to boil, once it’s boiling throw a handful of leaves, switch off the fire and let sit for 10 minutes. It’s a very delicate herbal tea.


Everything about nettles & 2 recipes

Springtime is my favourite season for foraging food. This year Spring brought us also isolation life, because of COVID 19, and so I find myself living alone in the countryside, with some neighbours that I can’t approach, though we talk keeping the distance. I’m new in this place; I relocated last December so I am curious to see what I can find in the surroundings. In the Luberon, I had my spots, which took me years to discover. There were delicious wild asparagus, leeks, dandelions, silene, hops, mushrooms in fall, borage, wild broccoli. I didn’t see all these here, but I found some beautiful nettles, and chives instead of leeks. I recommend you to wash your vegetables thoroughly when foraging. I prefer to cook them as well because there are foxes here and their faeces can bring the Echinococcus, which is a very dangerous parasite.

Nettles are one of the more versatile and tasty wild herbs I know, and they have a variety of properties, the most interesting of which is that they help our body to get rid of toxins in the blood. If you find some, cut just the tops, I choose the ones that look more vigorous and thick as they taste better.  You can use them in all recipes that are asking for spinach, so in this one, if you don’t have nettles use spinach instead!

Portobello Mushrooms and Nettles

Ingredients for four servings

Eight  Portobello Mushrooms

300 gr of nettles, or  400 gr of spinach

Two shallots

Two tbs. of extra-virgin olive oil

30 gr of butter

30 gr of all-purpose flour

300 ml of milk

Three eggs

a pinch of nutmeg grounded

50 gr of grated Parmigiano

salt and pepper

Directions

I wash the nettles thoroughly, then blanch  them in salted boiling water for 2 minutes. I drain them with a slotted spoon and throw in cold water to stop the cooking, and then I squeeze with my hands to take off all the water. I kept the water from pressing for making pasta as it had a beautiful green colour and a great taste. I chop the nettles very thinly on a cutting board.

I slice the shallots and put in a pan with the oil and a pinch of salt on low heat, let cook for 5 minutes or till they are soft then add the nettles, I mix well and cook for 2 minutes, put in a bow and let them cool. In the same pot where I boiled the nettles, I cook the Portobello mushrooms, that I previously cleaned, for 3 minutes, just to make them soften a little. When it’s done I let them cool on a cutting board.  How do I prepare the bechamel: I melt the butter in a saucepan, add the flour and stir till it starts to bubble, then add the cold milk all in a once, don’t be shy with it, it seems scary but this way you will have the best béchamel.  Keep on stirring till it thickens, and then I add a pinch of salt, the nutmeg and the pepper, I taste and eventually add some salt. I mix the béchamel with the nettles, l add the eggs and the Parmigiano while stirring, then I stuff the mushroom with it. I put the stuffed mushrooms in an oiled baking dish, and cook at 180° /375°F for about 30/35 mn or until golden.

This recipe can make a complete vegetarian meal accompanied with a green salad or a side dish for a roasted beef.

Pasta with nettle’s juice

You can keep the water you squeezed from the nettles, or any other greens you cooked, for a couple of days in the fridge.

My idea was about having green pasta, but it didn’t work for the colour, for that you need to add the vegetables. But the flavour of the water was delicious, and I found that it gave a deepness to the taste of the pasta. I made Pici; it’s the easiest way to make it; you just need a big cutting board, a knife and your hands. Children have a natural talent for it, so if you want to do something fun with them on a rainy Sunday morning, that’s the thing.

It’s a recipe with just flour and water; I use 100 grams of durum wheat flour per person, for the water it’s about half the weight of the meal, but I had it little by little as it can change depending on weather conditions and the quality of the flour. If you don’t have Durum wheat, you can combine a third of thin semolina and two-thirds of all-purpose. While all the recipes I found call for salt and olive oil I prefer not to use them, salt tens to oxidate the pasta and if you have some that you’re not going to use immediately you can let it dry and keep in a container for some days.

I pour the flour in a bowl, make a well in the middle and add some nettle water while I whisk with a fork, I keep on adding water till the dough comes together, it hasn’t to be too thick nor too soft. Once it’s ready, I knead it vigorously for 5 minutes or more if I am in the right mood, then I let it rest on the board, covered with the bowl, for one hour. That is important because the gluten will have time to transform, and you will be able to work it efficiently. Have you any memories about rolling your dough and seeing it retire? It happens when you don’t wait for enough.

In the meantime, you can prepare your sauce. Pici are lovely with many different condiments, this time I made mine with wild broccoli, just because in this period there’s so much to forage. You can substitute them with kale or broccoli leaves if it happens you have some, the kind of thing that we normally throw in the garbage.

How to shape the Pici

You can find that many people use a rolling pin, cut in strips and then roll the stripes. I think it makes the work longer. What I do is cut a small piece of dough and go with both hands till I get something that looks like thick spaghetti. And if the first ones don’t come out nicely, you can always redo! I sprinkle another cutting board with semolina, and when I have my Pici done, I lay them on the floured board, that’s important because otherwise, they tend to stick. Remember to keep the dough that you are not working covered with the bowl, as it dries quickly.

Wild broccoli sauce

I found the inspiration for this recipe thinking about some ways of serving pasta they have in the south of Italy, using vegetables like cime di rapa and now that I think about it I believe that wild broccoli has some resemblance with it.

I use the flowers and the leaves, the stems being hard even after cooking. Wash the broccoli thoroughly and get rid of the stems, keeping flowers and leaves. Wild herbs are powerful in taste and properties, so you don’t need a large quantity. For my portion of pasta, I used just four. I put some olive oil in a saucepan, one clove of garlic per person, just cut in two, let it cook on medium heat til the garlic starts to release its flavour. I add the vegetables, stir with a wooden spoon, salt with some good quality salt, sprinkle with chilli and black pepper.

Put the water to boil. The rule is 1 litre of water every 100 grams of pasta and 1 teaspoon of salt for a litre of water. Seems a lot but if you want to cook pasta properly do like this. Fresh pasta cooks in a few minutes, so it’s better to have everything ready.

The saucepan near the pot where you are cooking the pasta, some parmigiana or better, pecorino cheese grated, a bowl where you’ll save some water from the cooking pasta. Cook the Pici in boiling water, as they come to the surface, they are ready, keep some of the water. Strain them in a colander and pour into the saucepan, stir on high heat, adding some of the water you kept, add the cheese and more water if needed, that makes your sauce creamy. As a final touch drizzle some olive oil on top. Serve immediately! With pasta, I drink red wine, as it seems it helps to digest it.